Of Wires and Solder
I am interested in Keyboards, from the title you might’ve connected the dots to Mechanical Keyboards and yes I love Mechanical Keyboards. The clickety-clack of typing and annoying your friends(sibiling and family in my case) is so satisfying. I use gateron brown switches on my daily driver but always wanted to experiment on more switch types and keyboards. Sadly I was cut short into this experiment due to the diminishing bank balances and the anxiety of acquiring a new rabbithole-ish hobby which will drain my bank for times to come. Honestly the money part of Mechanical Keyboards were the main issue 😅.
Why build?
Why do we do anything ourselves? We know many tasks which are trivial for us to do but we do it anyway right? Take me writing and maintaing this blog as an example. Why do you think I do it? First of all to show off(I’m straightforward at times) to my peers and to write down my thoughts and views. Most times I want to write about personal stuff. This blogging gives me a feeling of ownership and it gives me the freedom to customize and make it apart. This Freedom is very important to me, and this ownership and freedom is quite rewarding. To call something your own and to say to someone, I built it is another level of personal achievement, the idea of using something you made by yourself and something that you actually own is so motivating.
The Own yourself part can be addressed with the questions ‘When do we own something? When we buy it? What if we can’t customize something we bought? Isn’t that a denial of our consumer right?’ so on… Most of us doesn’t take care about these and it’s because our society is built around it(Capitalism duh..).
You might then ask, Why build a macropad?
The answer is simple. To Learn! What’s the best way to learn soldering, about microcontrollers and diodes and other “electronic” stuff other than playing with them? We learn better with Trial-and-error. Plus the sheer enjoyment of working with Mechanical Switches, Electronic Components(controllers,led, diodes etc..) and building something that I’ll be using everyday (and accidentaly burning my skin with the soldering iron 🤪)
The Macropad
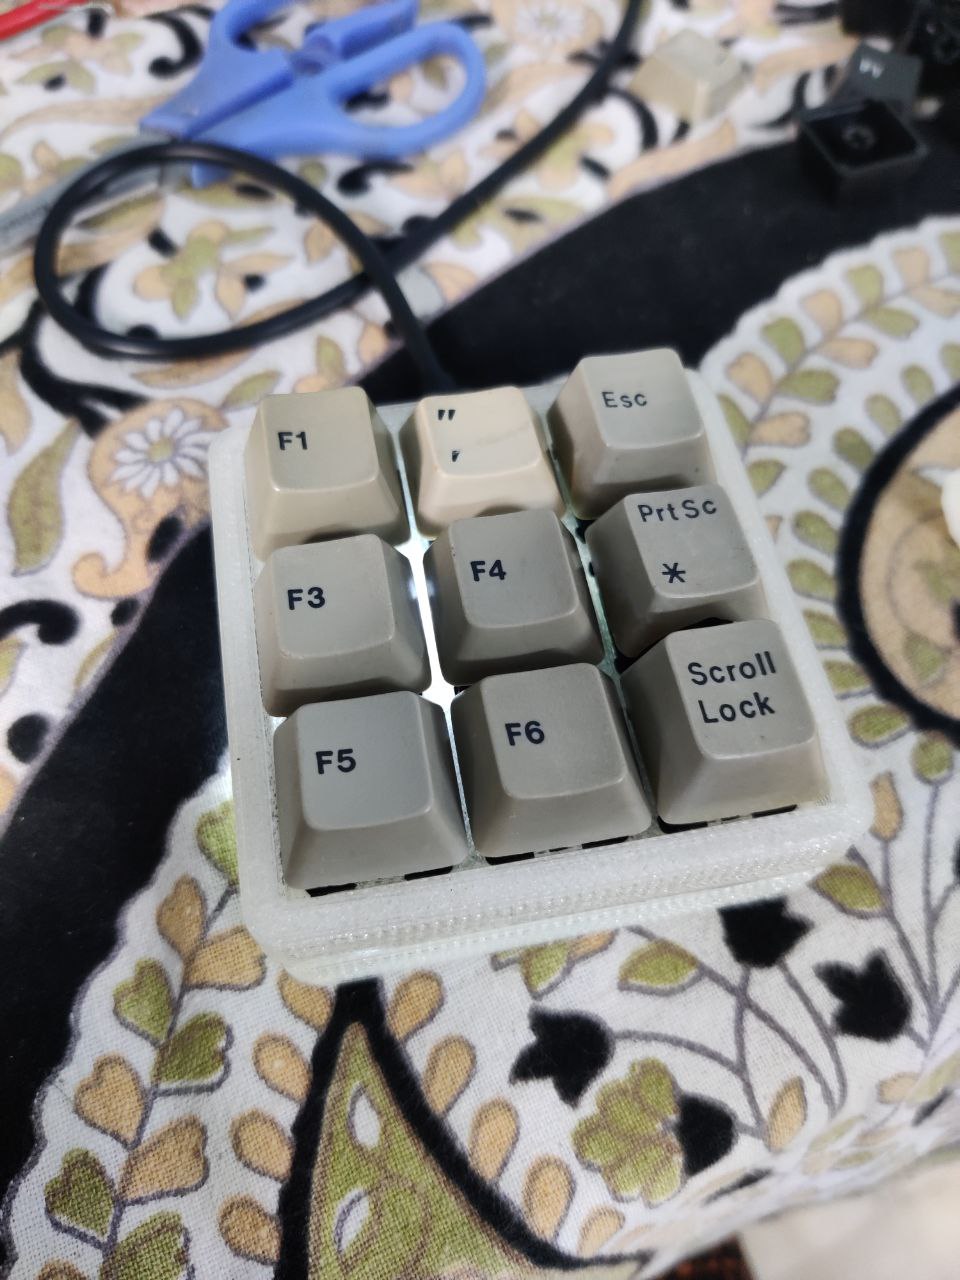
I’ve named this project MacroKuttan, which doesn’t mean anything of sorts other than ‘Kuttan’ being a pet name in my native toungue. I have 0 reasons why I named it but it fits in my perspective. It’s a 3x3 macropad or it has 9 keys. The making of the said macropad was after a lot of research and the cheapest way possible.The things used for making the macropad was
| Item | Price | Number of Items |
|---|---|---|
| Raspberry Pi Pico | ₹349 | 1 |
| Switches | ₹18 | 9 |
| Case(3D Printed) | ₹200 | 1 |
| Diodes(1N4148) | ₹2 | 9 |
This made the total cost of the macropad to be under ₹1000 or nearly equal ₹729 + Delivery Costs. The 3D printed case was from a friend of a friend who did it with transparent PLA, which turned out to give a translucent finish to the case.
The Build
I didn’t solder much before the project, so this was my first soldering project. I had actually a day in our College lab to learn soldering but I slept throught that one and it ended up biting me in the back with this macropad build. Eventually after looking at youtube and soldering small wires, I guess I eventually learned how to solder. It wasn’t perfect in any way but ended up being working.
- Learn soldering
I actually bought a local soldering iron for the first time and it stopped working after using it a few times to desolder old switches from another keyboard which I salvaged from my college. So I had to buy a new soldering iron, and this time bought one by Soldron. I had to buy a new ‘pointy’ tip for soldering sice the spade one was not working out for me well. I had tinted the soldering iron and started to solder the Keys and the diodes.
Most macropads have a PCB which the the keys only have to be soldered onto, but I opted for handwiring since it was easy on the pocket and it was a good oppurtunity to solder and learn about how a keyboard works inside 😉. Handwiring is relatively simple. The idea is to build a matrix with the switches and wires.
Since the macropad has 9 switches in a 3x3 manner, we need to have 3 columns and 3 rows of the switches. We just solder one leg/contact of 3 switches with a single wire and we do that for 3 time(3 columns) and we do the same with the 1N4148 Diodes with the other leg/contact of a switch. This resulted in something like this
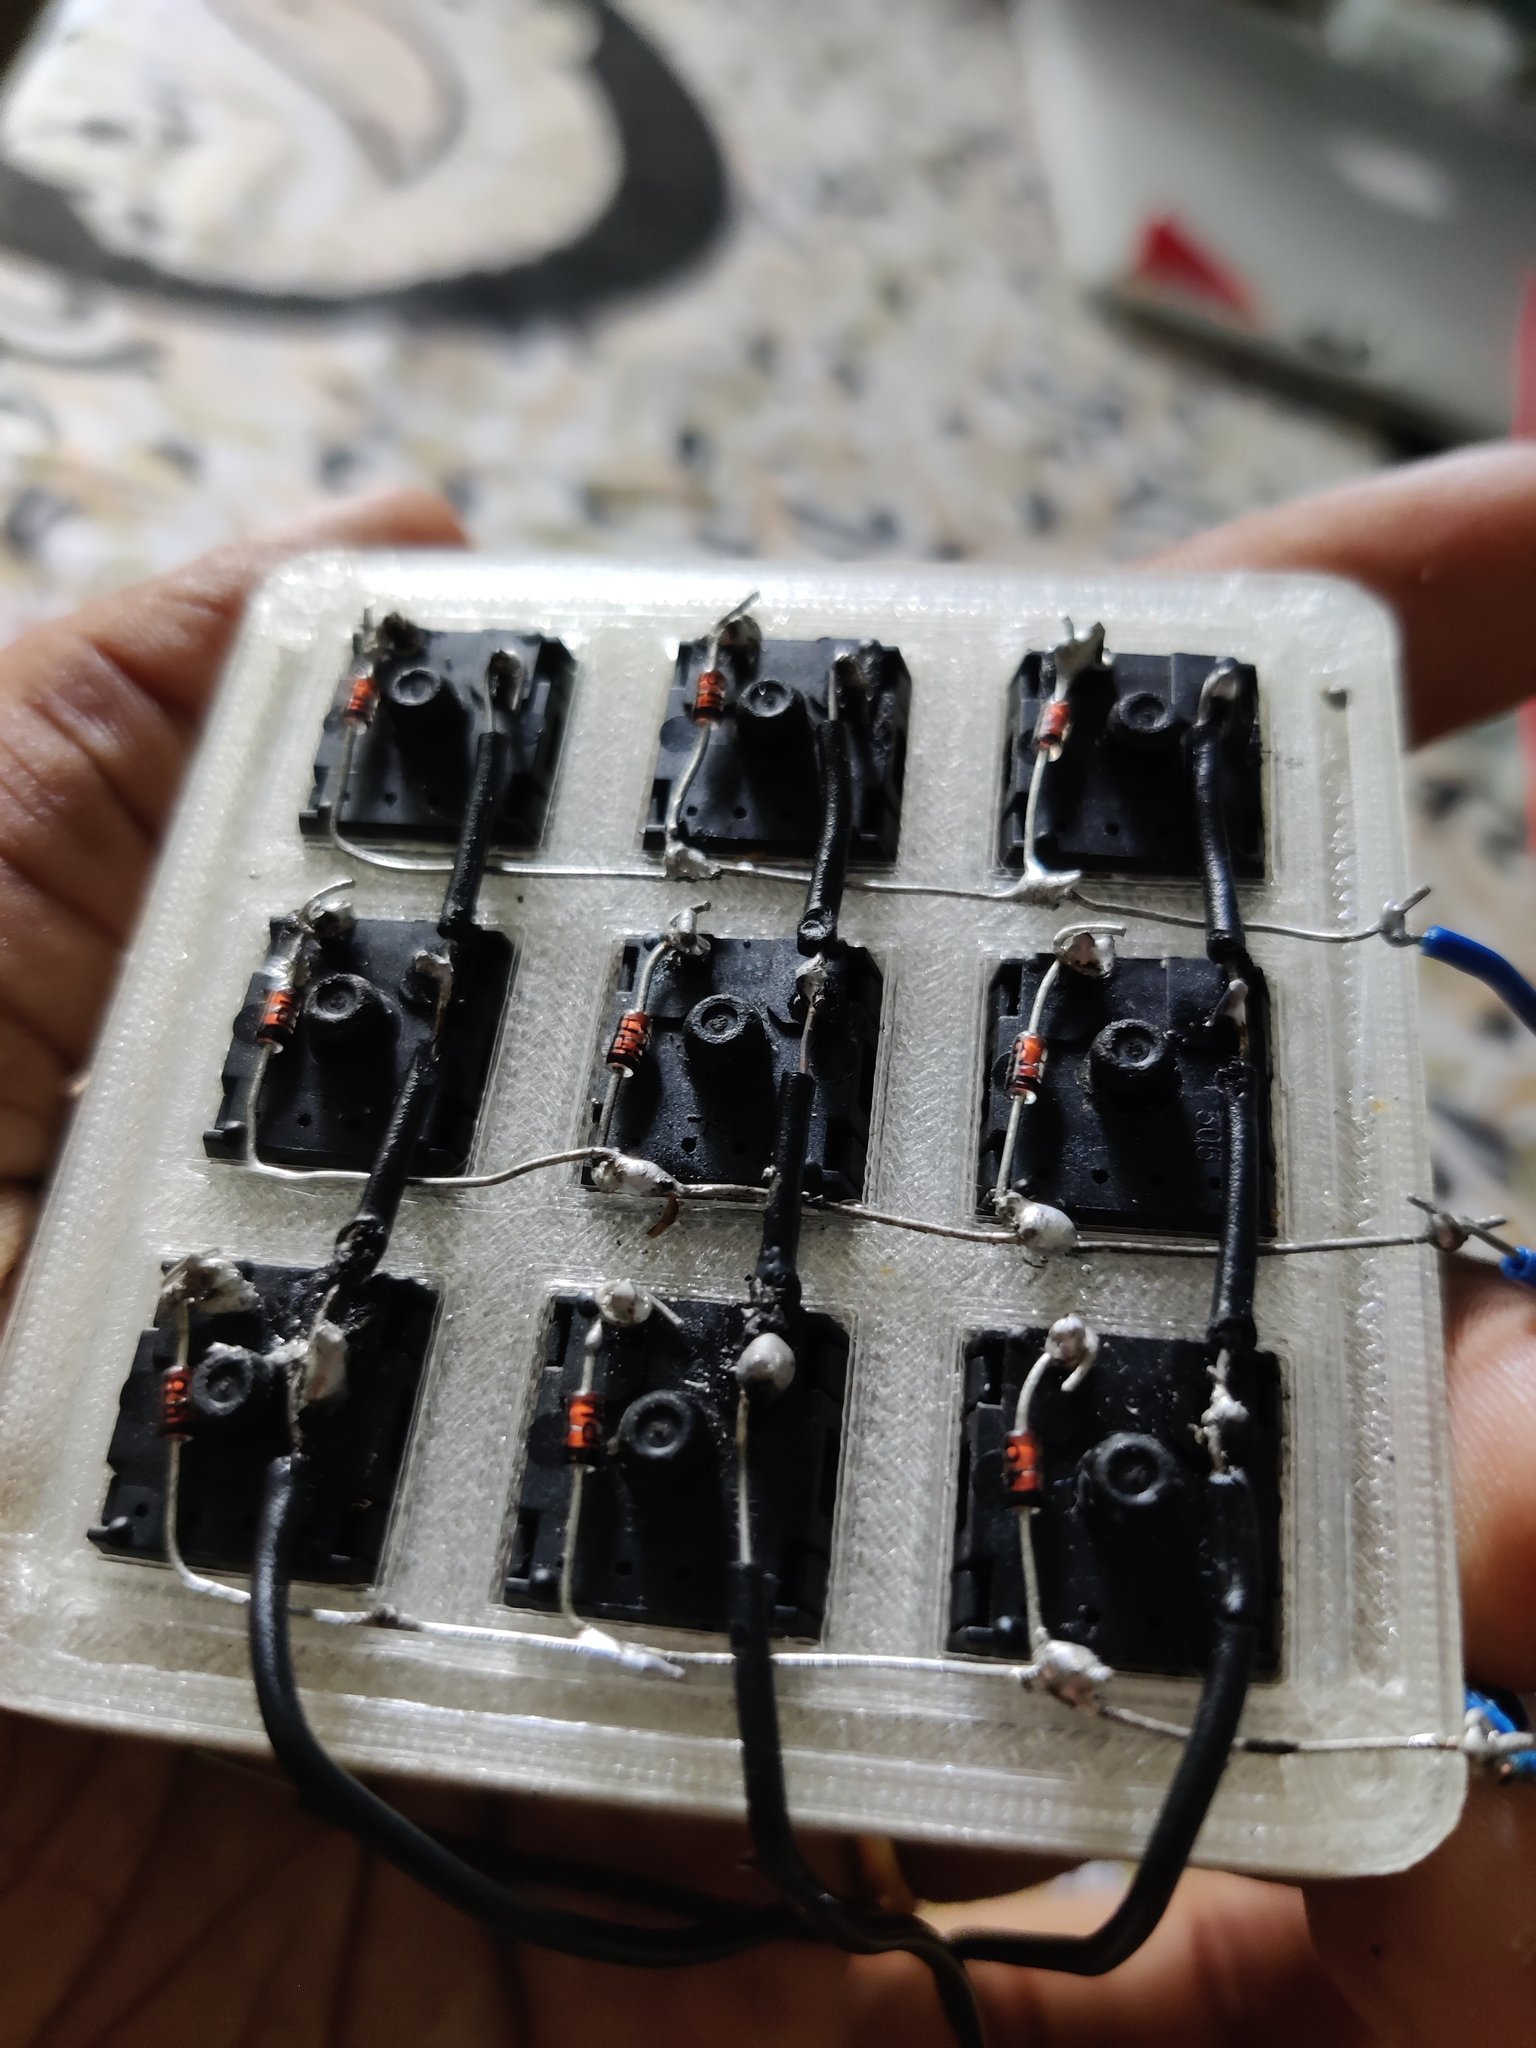
Yeah I know, very poorly soldered 🤪 but It’s the best I could do without any prior experience. I’m proud of what I did with the soldering. The Keys used are Cherry MX-Blacks salavaged from an old board. It works decently well but I had bought a few Gateron Blues and will use that in another macropad. Here the Black wires will act as a Column wires and the Blue/Diode wires will act as the row wires.
- Understand Keyboard Matrixes
After soldering the matrix, I soldered these to the Pi Pico. 3 GPIO pins for the column wires and 3 GPIO pins for the row wires. Phew, the soldering part is complete ⚡
Programming the Macropad
This is actually a very big freedom when you build your own keyboard/macropad. You can choose how you want your keys to be. If you want layers, you can add them, program a key to do multiple things and many more. This flexibility can be attained with a few firmwares specific to building keyboads and languages designed for microcontrollers. The main firmware for keyboards is QMK. QMK is written in C and has a large community behind it and a lot of controllers support QMK. There are other firmwares like ZMK and TMK and so on. All these are quite complex to start with and it takes some experience with C to CMake to start with. C was overkill for me 🙈.
I searched over Reddit and GitHub and found about KMK. KMK is in Python 🐍. KMK allows to program the keyboard/controller with Python and it works on top of CircuitPython which makes it even better. CircuitPython is by the folks at Adafruit which makes good electronic Components and related software(Their macropad is very cool). I also contributed a bit of docs to the KMK project which were a bit confusing at first.
- Learn CircuitPython and Programming microcontrollers
Programming the board was the easiet part of the build. It took a bit of trial-and-error to program it fully. Honestly I actually didn’t have a clear idea on what I should program the keys to do and later ended up keymaps to mute and unmute Google Meet calls for Online class. I also added some media key support and led animation switching. Also added a keymap to call Spotlight/Siri(hold) in Mac. Since the RPI Pico only needs a single code.py file to run when connected, it makes a lot simple to use the macropad. Plug-n-Play FTW!
Here is the whole config for the macropad.
import board
from kmk.extensions.LED import LED
from kmk.extensions.media_keys import MediaKeys
from kmk.handlers.sequences import send_string as ss
from kmk.keys import KC
from kmk.kmk_keyboard import KMKKeyboard
from kmk.matrix import DiodeOrientation

keyboard = KMKKeyboard()
led_ext = LED(
    led_pin=board.GP0,
    brightness_step=5,
    brightness_limit=100,
    breathe_center=1.5,
    animation_mode=3,
    animation_speed=0.1,
    val=100,
)
keyboard.extensions = [led_ext, MediaKeys()]
# keyboard.debug_enabled = True

keyboard.col_pins = (board.GP19, board.GP20, board.GP21)
keyboard.row_pins = (board.GP11, board.GP12, board.GP13)
keyboard.diode_orientation = DiodeOrientation.COLUMNS

GMEET_MIC = KC.LGUI(KC.D)
GMEET_VID = KC.LGUI(KC.E)
send_roll_no = ss("15 ")

keyboard.keymap = [
    [
        KC.LGUI(KC.C),KC.LGUI(KC.V),KC.LGUI(KC.SPC),  # 1st row
        KC.LED_TOG,KC.MPLY,KC.MNXT,  # 2nd Row
        GMEET_VID,GMEET_MIC,send_roll_no,  # 3rd Row
    ]
]

if __name__ == "__main__":
    keyboard.go()
With this the whole macropad works. I also added a Breathe LED animation with a single LED lying around. The case is translucent and the breathe animation gives it a good aesthetic to the macropad and the desk. I had some old(like really old) keycaps lying around and added that to the keyboard which gave a retro look to the whole macropad. I’m very proud of myself with how it turned out.
Here is the final image after the build.